


One of the most dangerous handgun safety mistakes is not keeping the gun pointed in a safe direction. Shooters should not point the muzzle of a gun at anything they do not want to destroy. Well, last week I got a very serious reminder of this critical safety rule. My wife and I were teaching a handguns skills class and I was working closely with a student at the range who had never shot a pistol before our class. As always, I was being very cautious, thorough, and deliberate in my range instructions, observations, demonstrations, and safety and shooting procedures, since I value safety as the most important part of our entire 8-hour class. The student was having a difficult time hitting anyplace on the blank paper-plate target at 7 yards because of her flinches and jerks. We had completed the bench rest shooting and two-handed standing shooting and I watched her first take the magazine out and then check the chamber both visually and tactilely. I was proud of her safety-check procedure and then it happened. She began to slowly place the pistol on the bench with the action open and the muzzle pointed downrange as she was instructed to do…. but then as she turned her head to the side she very suddenly turned the muzzle 90 degrees to that same side and pointed the gun directly at my wife’s face who was instructing another student at the next bench. In my over 40 years of teaching, no student ever pointed a gun at me or my wife. I was up close and “in the student’s face” as the barrel started to turn, I quickly grabbed the muzzle and pointed it in a safe direction and no one got hurt. I knew the gun was unloaded, but others did not. Still, this is a major concern and the student did not qualify at this session for safety and other reasons. I will work with her to help her every way I can. She now has a refresher on the procedure and very clearly knows what she should have done. But, I can still see the shocked and scared look on my wife’s face and of the other students in that very quick second. There is no excuse whatsoever for a safety violation, especially after several hours of recent safety rules presentations with examples and muzzle control being emphasized and with hands-on training. “Oops I’m sorry I killed you” doesn’t matter at all. It won’t fix it. Words alone are not sufficient to solve the problem. The muzzle discipline must be demonstrated there without excuses, in this life and death matter. I knew she did not mean to do it and regretted it, but someone could have been killed for eternity. Focus and concentration are key, if you have a deadly gun in your hand. So, it is very important to know and practice how to handle the gun safely at all times. And this includes times when you are not shooting the gun. We need to know and exhibit muzzle discipline. Part of that is knowing and practicing different Ready Positions for everyone’s safety.
Ready positions are methods of holding the gun for safe muzzle awareness and to protect people before, during, or after a real or potential threat attack or while shooting at the range or even in a shooting class. After you draw your gun, when moving with your gun, when engaging threats, or being ready to possibly and quickly shoot at a target or threat, it is very important to know what to safely do with the gun’s muzzle. This includes when you are through shooting, like with the student. Where do you point the gun’s muzzle if there are several people around you? What is a safe position to point the gun when there is not a readily-identifiable target, but soon may be? We all know the answer is down range and in a safe direction, but do we ALWAYS practice it. It is very important to know where to point that muzzle and how to safely handle your gun and practice to develop brain habits and muscle memory to automatically do it. There are very many Ready shooting positions and various names are used for them. There are the Relaxed Low Ready, the Retracted Low Ready, the Traditional Low Ready, the High Compressed Ready, and the Temple Index-Muzzle Up for examples, among others. Keep in mind that there is a difference between range-only shooting Ready positions for fixed targets and real-world, life-or-death Ready positions for street attackers. While there are many Ready positions, each with their own pros and cons, I want to present just five of the general Ready Shooting Positions.
- SUL Position
- Low Ready
- Modified Low Ready
- High Ready
- Modified High Ready
SUL POSITION
SUL was developed by Max Joseph and Alan Brosnan in Brazil in 1997 while working with the South American Police. Its purpose is to serve as a safe pistol carry position for Close Quarters Battle (CQB) and to protect others in the presence of fellow friendly shooters. Going to SUL keeps your muzzle off back-up personnel and other friendly operators. It is used to check 360 degrees around yourself or move around things or people you do not want to cover with the gun’s muzzle. The SUL Position is designed for quick and efficient presentation of your pistol from a neutral body position. The term SUL translates literally to “South” in Portuguese. This emphasizes the fact that the gun is pointed down when using the SUL position.
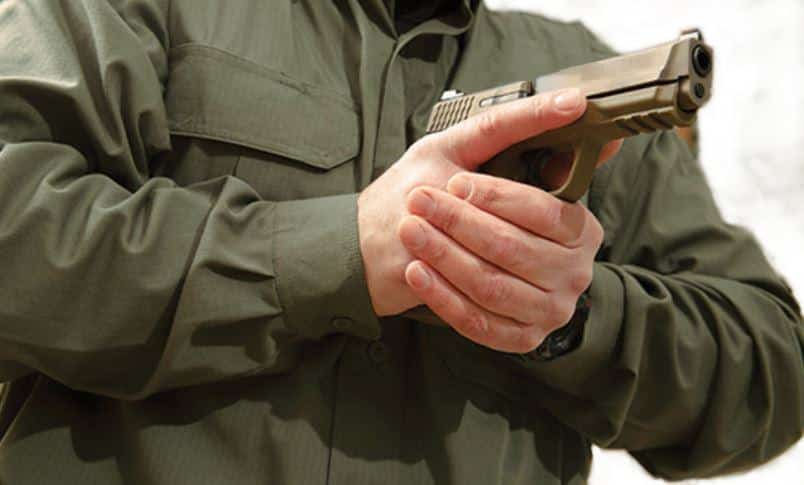
To achieve the SUL Position, place your support hand flat and horizontal against your stomach on top of your bellybutton. Your strong hand with the gun is placed on top of your support hand, with your finger OFF the trigger and the gun’s muzzle pointed down toward the ground between your feet. The gun is slightly angled outward about 15-20 degrees away from your body, so as to not sweep or muzzle your feet. With SUL, both thumbs should be touching and form a square shape. The support thumb is pointing up towards the shooter’s chin. I believe it is important to recognize and practice this. (But, another variation says the middle finger knuckle of the strong hand and the crook of the support hand’s index finger should be the only points of contact.) The slide of the gun is held against the back of the knuckles of the support hand. The strong hand thumb is extended towards the support hand thumb. Other shooters with pistols having mechanical safeties say they must keep their thumb on the frame to engage the safety, but I believe this is primarily a training issue. I know as a 1911 shooter my thumb sweeps the safety off as the pistol comes up.
A typical mistake by some SUL users is that the pistol’s muzzle is canted outward about 45 degrees toward a nearly horizontal position with the strong hand. Of course, this is a safety hazard and negates the safe carry intent of the position. Also, if there is a need for a quick shot, the support hand could fail to get a good two-handed grip. An advantage of SUL is that it is comfortable and can be maintained for an extended time period, in addition to the muzzle-direction safety advantage.
When should the SUL Shooting Position be used? Generally, it is used in four fundamental situations. First, when you are moving among friendlies with your team of shooters and you are NOT the lead, front cover team member, with safety as your top priority. Usually, the first operator in a formation may present his/her weapon, but it is imperative the others orient their pistol safely. SUL allows this. Second, when friendly persons need to cross into your sector or line of fire when they are moving around teammates. Third, when you need a quick safe position to move the gun to when a friendly or another inadvertently crosses into your line of fire. Fourth, when holding or controlling the bad guy/gal until authorities arrive, without necessarily pointing your gun at them but being ready.

LOW READY (LR)
The LR position is one of the most frequently used ready positions for tactical shooting by law enforcement officers (LEO) and the military, when searching for a target or rapidly approaching a target area or threat. For law enforcement or the home defender, the LR is an excellent challenge position and you can see the bad guy/gal’s hands easily because the gun is pointed down away from your eyes. It is also a position often used in handgun training classes and competitive shooting events. Students use it at the range after a shot and just before they are ready to shoot again. So, we use it in our training classes when students are transitioning between targets and getting “Ready” to shoot again. Also, we use it to give students a calming break and for deep breaths to relax safely before the next shot. CAUTION should be used with new shooters and all shooters not familiar with this Ready position, since they have a loaded gun in their hands and are “Ready” to shoot again. Awareness of people around you, your surroundings, and your particular situation are very important with this READY position, as with all of them. It is the fastest position to move TO after initially shooting and the quickest to move FROM by simply raising the gun quickly back to the target. In this position, the shooter has the chance to verbally challenge a possible threat or to deescalate an attack at a distance. The shooter can keep their eyes on the target or threat and engage them quickly from this position.
To assume the LR position from the usual extension shooting position, drop the gun’s muzzle down to a 45-degree angle and point it outwards at the ground and in front of the target, NOT directly at the target and NOT directly down at the ground immediately in front of the shooter. The gun is held in the lower abdomen area.
A problem with the LR is that it can be difficult to maintain and hold for long periods of time. Also, at close combat, tactical distances, it may put your gun too close to your attacker who can grab it or immobilize you with a bear hug. During search and seek tasks, it may not allow you to move about easily and quickly when up close.
MODIFIED LOW READY (MLR)
The MLR position is very similar to the LR, but the gun is only lowered to about chin level and a little below your line of sight. The MLR advantage is that because the gun is lowered to just below your line of sight, you are more READY to quickly bring the gun back into your vision for front sight focus and alignment or point shooting. Another advantage of the MLR is that it is a very Ready position to help control a close-up attacker for compliance, so that firing a shot may not be necessary. Remember, AVOID confrontations if at all possible. With the MLR, as with any of the Ready positions, it is very critical that the shooter’s trigger finger be off the trigger, not in the trigger guard area, and with the gun pointed in a safe direction. The shooter should be Ready to fire ONLY if eyes and sights are on the target or threat AND you are “Ready” to shoot. With the gun held at chin level and it quickly being able to be brought into fire, it is very easy to move the gun to an unsafe position or have others cross in front of your muzzle with the MLR. So be very aware and BE SAFE with this and all Ready shooting positions, since you are so very “READY” to shoot.
Both Low Ready positions require that the gun be brought to the line of sight for firing from a non-extended arms position. Because the arms are not fully extended, it may be more difficult for the bad guy/gal to take the gun away from you with your arms in close to the body and not fully extended. Thus, better gun retention in several situations.
HIGH READY (HR)
The High Ready position is often called the Center Chest Position, since the gun is held with two hands high in the center of the shooter’s chest. It is a close-range position with the gun held in very tight and about 8 inches or so in front of your nose. Because the front sight can already be in line with your target or threat with the HR, it is usually faster than the LR for a shot.
In the HR, the forearms are resting on the lower ribs of the shooter with the muzzle of the gun held parallel to the ground at your center chest area and pointed slightly downward toward the area of the threat. Usually, the shooter can only see the gun in their peripheral vision. The gun can be immediately fired without sighting in close quarters (from the armpit) when held this way or it can be quickly brought up and extended outward for a sighted firing position. This is a very practical, real-world shooting position for close encounters (say 1 to 3 feet away), but may violate some local range safety rules and regulations. So, check with your range and be very careful if your gun’s muzzle is pointed somewhat upwards with limited space and when several folks are moving around you. You must also consider specific safety precautions with this position. Be aware that the gun is going to fire in very close proximity to your ears, eyes, and face, so be very careful and plan for this. You do not want to slip your grip, get bumped in your stance, or get startled in the HR.
Some say the HR is nothing more than the LR held at the sternum or center chest area, rather than lower abdomen area. Sometimes HR is referred to by some as “Hollywood Ready,” because it places the gun next to the actor’s face which makes a more dramatic scene.
MODIFIED HIGH READY (MHR)
MHR has the muzzle at a 45 degree cant upwards and a moderate distance from the body. The MHR can include the basic HR position with a change to only one hand being used. Some call the MHR the “Shooting from the Armpit” position or the “Close Retention High Ready” position. Here the gun is brought to the shooter’s strong side armpit while maintaining the two-handed grip with the muzzle pointed slightly upwards. Be careful with this position with the muzzle pointed upwards. SAFETY FIRST!
Conclusions
All Ready positions have pros and cons and are situational specific. I like the low ready position with its down and out position for the muzzle and opportunity for full field of vision. With the LR your arms may tire easily. Also, the SUL position works well for me in a crowded group of folks when you are moving around and very concerned with muzzle control. It is a very safe position in these situations. In special circumstances only, you may want to use the HR position, so be aware of the gunshot near your face, eyes, and ears. I hope my summary of Ready Positions has helped you as a starting point for your own research and decisions.
Continued Success & Be Safe!
Photos by author.
Note: This personal opinion article is meant for general information & educational purposes only and the author strongly recommends that you seek counsel from an attorney for legal advice and a certified weapons trainer for proper guidance about shooting & using YOUR firearms, self-defense and concealed carry. It should not be relied upon as accurate for all shooters & the author assumes no responsibility for anyone’s use of the information and shall not be liable for any improper or incorrect use of the information or any damages or injuries incurred whatsoever.
© 2016 Col Benjamin Findley. All Rights Reserved. This article may not be reprinted or reproduced in whole or in part by mechanical means, photocopying, electronic reproduction, scanning, or any other means without prior written permission. For copyright information, contact Col Ben Findley at [email protected].

