Everyone needs a target stand for practicing and improving their handgun skills. I am not sure if you have priced a basic target stand lately, but you can pay anywhere from $50. and up for a very simple stand. When you add in the high cost of shipping or delivery, you can have a lot of money committed for a simple target stand. Well for me Mr.Thrifty, it makes sense to build my own from PVC Schedule 40 plastic pipe (thick walls for stability & durability), with very little effort. I wanted the stand to be adjustable or accommodate different target sizes from 18″ to 24″ wide, so I can use it for IDPA, IPSC, silhouette targets, and others as necessary. I also wanted to build it for no more than a cost of $20. What a challenge. Now understand I am not Mr. Wizard nor have I won Handyman of the Month. My lovely wife gets mad at me for lacking handyman and fix-it skills, but I tell her that I have other skills. She replies “Well what are they?” Such a challenging life. So I had to prove to myself and her majesty that I could make a very simple, sturdy, and low-cost $20. target stand and I did. It cost me less than $20. I even made three more. So I want to share my simple target stand plans and experience with you. Feel free to use my simple plan. Hope it helps you. I might add that I made my first stands like this about 10 years ago and they are still working fine. I transport 2 or 3 stands easily in my small SUV for our weekly classes. I put 4 small targets on each stand. They are very portable, lightweight, durable, waterproof, adjustable, simple to build, require little storage space, and are very low cost.
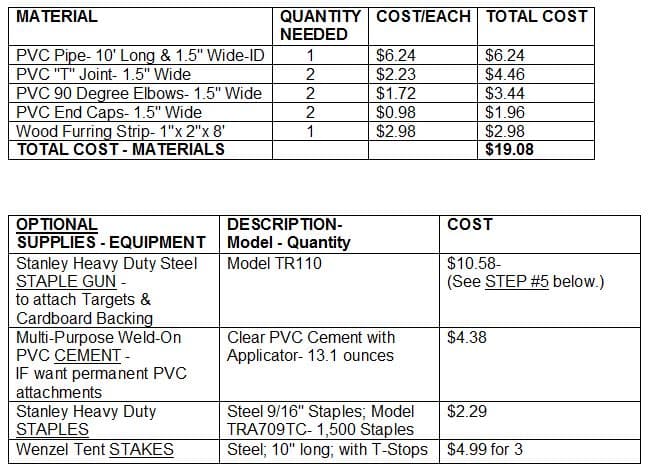
Here are the Materials I used from Home Depot here in the panhandle of Florida, the quantity and their best costs, and some optional supplies and equipment you might want to consider.
DIY Portable Target Stand Construction Process
STEP #1. First I bought a 10 foot long piece of PVC Pipe that was Schedule 40 rated for thick walls and durability, with an Inside Diameter of 1.5 inches. I learned that PVC pipe sizes are named by the measurement of the Inside Diameter (ID or bore) of the pipe and not the Outside Diameter (OD.) If you measure the OD it will give you a larger reading than the actual PVC pipe size.
STEP #2. Then I had the store cut the 10 foot length of 1.5″ PVC pipe into 7 pieces each 16″ long. See image below with 7 cut pieces. This was a total of 112″ or 9.33 feet used. There was 8″ of PVC pipe left, which you can use to adjust the length of the stand’s middle crossbar to make it wider for a wider target later, if desired. If you do this, you can buy an inexpensive PVC connector. Also, have the store cut the 8′ Wood Furring Strip in half to get your 2 strips.

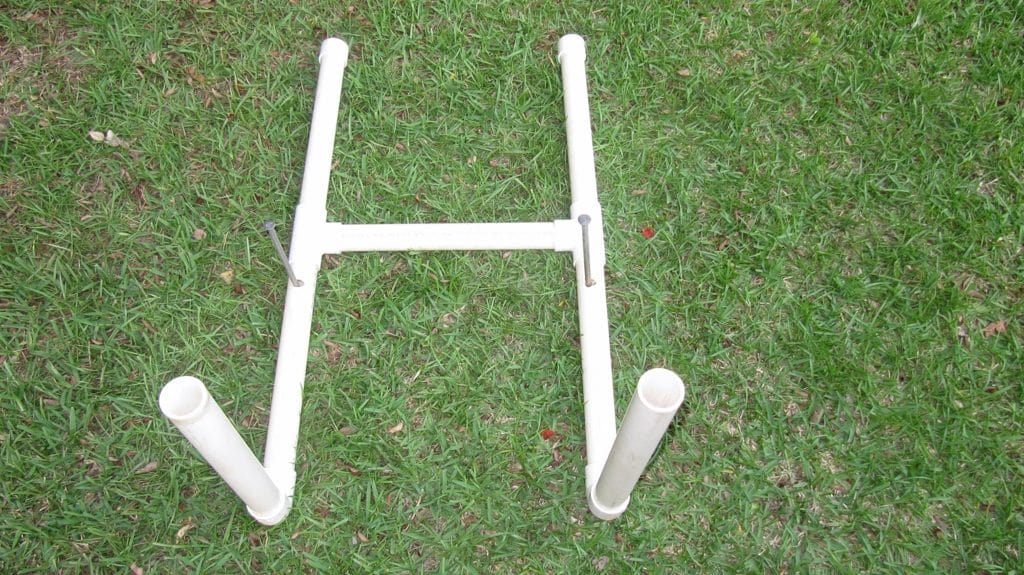
STEP #3. I assembled five 16″ long pieces to form the base of the target stand, using the 2 T joints and 2 End Caps. The remaining two pieces of 16″ length were added as vertical sections using the Elbows at the ends opposite the End Caps, where the wooden furring strips will be inserted. I then drilled a small hole in each of the two horizontal side PVC pieces near the vertical pieces, so I could insert a tent spike/stake in each if needed for stability for windy days and to anchor the stand to the ground. The spikes came in real handy for windy days at the range, so drill these 2 holes. I learned after my first stand, that the Wenzel stakes with the T-Stops help anchor the stand better. Be very careful if you decide to use PVC cement to permanently attached the PVC pieces, since it is very caustic and dangerous to your health. Make certain there is adequate ventilation for the PVC fumes. I did NOT cement the pieces together since I wanted to have a very portable stand and for easier storage. Some cement the 5 pieces together for stability, but do not cement the 2 vertical pieces. Your decision. You can also use a PVC Primer before using the cement for a stronger hold.
CAUTION! The vapors from the PVC cement and primer can make you dizzy and are dangerous to your health. Make certain you have plenty of ventilation or wear an approved vapor respirator when working with the cement and primer.

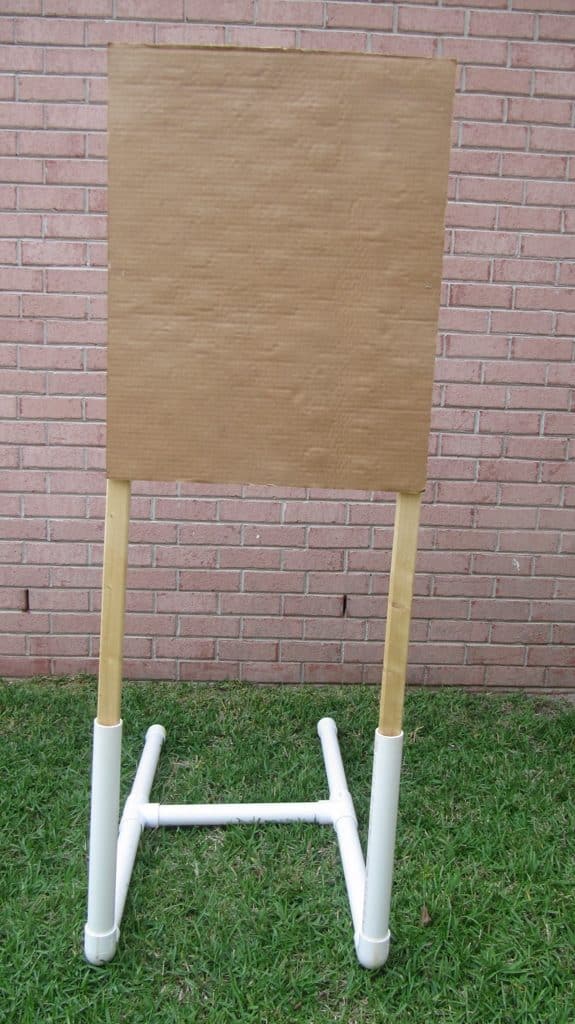
STEP #4. I inserted the two 4′ wood Furring Strips into the vertical PVC upright pieces.
STEP #5. I used a staple gun to attach the cardboard backing to the wood Furring Strips. I recommend that you use a heavy-duty steel staple gun and 9/16″ heavy-duty longer staples to firmly attach the cardboard and targets. Initially, I used 1/4″ and 3/8″ long staples, but they did not hold as well. If you need a staple gun, there is no need to pay $20 or $30 for a heavy-duty steel staple gun, since there is a good heavy-duty steel one made by Stanley (Model TR110) for less than $11.
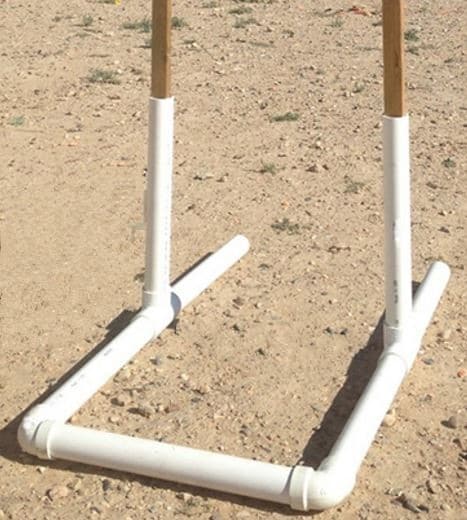
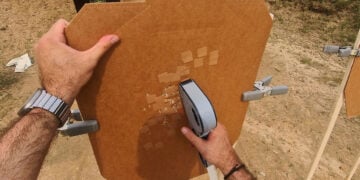
STEP #6. Attach your target to the cardboard backing with the staple gun and staples as shown in the first picture. Now, you are ready to practice shooting with your new target stand. It probably took you about 10 minutes to assemble, after you bought your materials, and it cost you about $20. for a decent stand. There are many variations for this target stand. Another stand Option #2 includes putting the two vertical PVC pieces back in the middle of the cross section using PVC connectors, rather than at the front on the horizontal lengths as with this first version. Option #3 includes placing the vertical pieces in the center on the sides. See these Option images below with the verticals in the center. This might make the spikes not needed for stability, but it can get very windy and even these options may still require the spikes, as I discovered. Another Option is to use PVC 2″ ID wide pipe for a larger stand. Do you have an inexpensive, portable, and sturdy target stand plan or idea to share? SUCCESS!

Photos by Author.
* This personal opinion article is meant for general information & educational purposes only and the author strongly recommends that you seek counsel from an attorney for legal advice and your own personal certified weapons trainer for proper guidance about shooting & using YOUR firearms, self-defense and concealed carry. It should not be relied upon as accurate for all shooters & the author assumes no responsibility for anyone’s use of the information and shall not be liable for any improper or incorrect use of the information or any damages or injuries incurred whatsoever.
© 2017 Col Benjamin Findley. All Rights Reserved. This article may not be reprinted or reproduced in whole or in part by mechanical means, photocopying, electronic reproduction, scanning, or any other means without prior written permission. For copyright information, contact Col Ben Findley at [email protected].





Hi,
the instructions noted an 8’ – 1”x2” fir strip. This will not fit inside a 1.5” ID PVC post. Was this an error?
Email: [email protected]
Comment:
Hi,
the instructions noted an 8’ – 1”x2” fir strip. This will not fit inside a 1.5” ID PVC post. Was this an error?
Ron
Reply by Col. Ben:
Ron, it is likely that a 1-inch diameter wooden fir strip will slip into a 1.5-inch internal diameter PVC pipe. However, depending on the specific materials and manufacturing tolerances of the fir strip and the PVC pipe, there may be some slight variation in the fit. PVC is identified in NOMINAL internal diameter. Sadly, manufacturers of PVC pipe have specifications which show that the actual measurement is NOT precise. So, at your local hardware store, it would make sense and be best to test the fit before buying and using the fir strip and PVC pipe together in any target stand. Fitments can and do vary a lot by the type of wood and plastic PVC pipe and specifications. Success my friend! Ben
Thank you for the quick response!