I have noticed and received comments from those who have difficulties racking a pistol slide. They desperately want some help, device, or tips for racking their semi-automatic pistol slide and operating their gun more easily and safely. Many are women and some are men with less upper body, arm, finger, and hand strength. Some are physically disabled or impaired by age because of certain medical conditions, syndromes, and diseases that directly affect gun manipulation, control, and use. Some say that if someone lacks the manual dexterity and/or strength to rack a pistol slide, they probably should NOT be using a firearm. Others strongly disagree and say that they are the ones most in need of help handling their pistol. This is a very personal and emotional matter. Usually and generally, I initially suggest a refinement and practice of their slide-racking technique because I believe, and have proven to myself, that most of the time shooters do not know the proper technique for racking a slide, or do not regularly practice it. See my previous article “Racking the Pistol Slide: Technique Not Strength” on this website on 1/7/13. But, certainly the solution is not always about technique and leverage because physical strength can be greatly diminished by severe medical conditions, personal abilities, and disabilities like arthritis and Parkinson’s Disease. Shaking hands, frequent twitches, stiffness, pain, decreased range of motion, and diminished fine motor skills, etc. must be considered.

Before possible solutions are generated and the problem solved, the use or purpose for the gun must be understood, specific personal limitations that affect handling the gun recognized, the goal stated, and the specific problem defined. What is our primary use for the gun? Is it mainly for home defense or carry purposes? Understanding this may open up more alternatives to consider, like maybe a long gun option which might be better suited for some individuals and more controllable to use in the home, but certainly not for concealed carry purposes.

Perhaps, the stated goal is to be able to load, unload, clear stoppages, and operate the gun efficiently and safely. Realistically assessing the strength level and health of the individual and its impact on safely handling a gun is an important initial step. Some have pre-dispositioned themselves to believing that they cannot rack the slide. They may not have sufficiently practiced and trained in the proper technique to do it. Or, perhaps a gunshop salesman has convinced them that they absolutely need a revolver because they cannot rack the slide. But maybe that revolver has a heavier double-action press that is even more difficult than racking the slide and thus may affect accuracy because of the added movement. Maybe it is a grip problem. Be aware that becoming so focused on racking the slide may create safety problems, like not paying attention to safety rules and placement of the trigger finger on the trigger while racking. It varies so much and these variables relative to the goal must be considered individually.
Brief Summary of Over-the-Top (OTT) Technique of Slide Racking
Of the several slide-racking techniques, the OTT Technique of racking the slide works best for this old codger and for my arthritic wife. The force required to accelerate an object of a given mass by a given amount will always be constant, but the difference between pushing and pulling is that people are different with varying muscles, joints and tendons and related strengths. So our energy expenditure varies and pushing feels easier for most because the point of contact with the gun can be braced up against the body, allowing you to use your big driving muscles (quadriceps, etc.) much more efficiently. To me when you pull, you have got to try to keep your arms rigid to transfer more of your driving energy into the gun, burning more energy just in your arm muscles than when you push.
So here is the OTT Technique we use. For safety reasons, remember to keep the pistol pointed down range with the ejection port up and practice with an unloaded gun. Rest the gun above your waist and really close to your body for better leverage, while using your support hand to grasp the rear slide serrations over the top of the slide. The heel of your support hand should rest on the inside, left-side serrations (for a right-handed shooter), while you grasp the outside, right-side serrations with all 4 fingers of your support hand. Your support hand thumb is at the rear of the slide and does not grasp the slide. Then you PUSH the gun forward with your strong hand, rather than solely PULLING the slide backwards with your support hand. This method may not be as fast as the Slingshot Method, for example, but it does give you the most powerful grip on the slide because you are using more fingers and the heel of your hand for added strength. Again, the key is to PUSH the gun forward with your strong hand. It is best done with the pistol close to your body where the pistol is suppose to be when it is not being fired. This technique works quicker for me and seems more flexible and efficient for racking in many different situations. A lot of shooters agree with me, but you practice both and decide for yourself. Be aware and do not point the muzzle to your left (for right-handed shooters) or support side, while performing this or any slide racking method. This is dangerous and might harm other shooters in the area.
Slide-Racking Devices
In addition to the proper “push” motion and “close-to-the-body” aspects of a proper slide-racking technique, I am aware of two devices that might help those medically or physically-challenged with safely racking a semi-automatic pistol slide. There are probably others. The ones I am familiar with and have tried are the Brass Stacker Slide Pull Charging Handle and the Handi-Racker Pistol-Assist Device. Here is some information about theses two and my opinions.

Brass Stacker Slide Pull Charging Handle

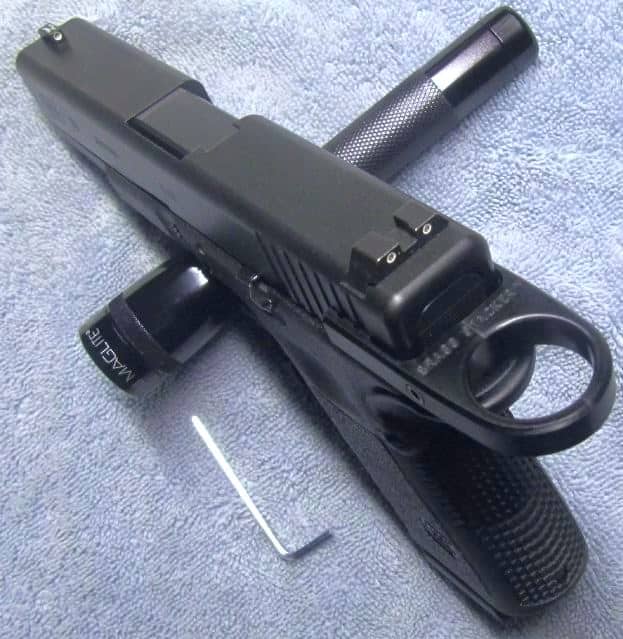
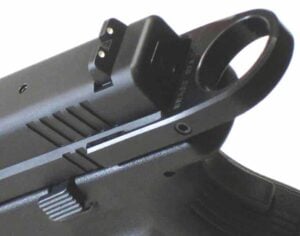
This tool to help with pistol slide racking is made of two metal halves machined from lightweight aluminum with a hard coat anodized finish. They are connected together with a pin and a bolt to form a handle with a loop that attaches to the rear of the gun’s slide. It attaches easily without any modifications by aligning the grooves in the handle to the rear last 3 serrations manufactured into the slide and then tightening the handle with the supplied hex wrench for a secure fit. It functions as an easy-to-grab loop at the rear of the slide to allow the shooter’s index finger of the support hand to grab the loop and easily and safely pull it to the rear, while the strong hand firmly holds the pistol in place. The handle did not come off when I shot about 20 rounds through my Glock 19 at the range and it seemed to be securely attached. I would think you would have to regularly check the screw tightness to ensure proper fit, function, and safety.
MSRP: $42.
Availability: Currently made for most Glocks and the Springfield Armory XD; others are being developed.
Some Considerations: I discovered that it is important to not put too much support index finger in the loop when grabbing it and starting to rack the slide. If so, there is a chance that you might cause a malfunction or stoppage, although a small chance. Practicing with the charging handle will develop your muscle memory to avoid this. For me, the handle loop I added to my Glock 19 for trial did sit high enough on the slide, so that it did not snap forward after racking and injure my hand or cause a slide “bite.” Also, it did not obscure my sight picture. The handle does add about an inch or so of total length to the rear of the gun, so it complicates carrying some guns concealed. But you probably do not want to add this particular device to your gun for that purpose anyway. I found the slide pull charging handle to enhance the leverage when racking and I can see how it would help those with limiting medical conditions and weakness in hands, fingers, and arm strength. However, for me I felt much more comfortable racking the slide my usual way using the OTT Technique, but I do not have major medical conditions or weaknesses in my hands, fingers, or arms to really test its effectiveness. Some of my students, however, did find the handle to be helpful with their medical conditions and weak strength in their hands/fingers. Not having handles fitted and available for a wide variety of pistols is a delimiting factor at this time. I do recommend the handle for those with severe medical conditions and weakness in their hands, wrist, and fingers who have difficulty grasping slide serrations. However, this should not become a crutch or substitute for not learning the proper and safe technique for racking a pistol’s slide.
Handi-Racker Pistol-Assist Device
This is a tool designed to help people rack the slide of their pistols. It is a block of plastic that fits over the muzzle end of the front of the slide. It has a cutout channel in the front to allow the front sight to fit there and is channeled to firmly press against the front of the slide and allow the barrel to protrude forward. After placing the Handi-Racker (HR) on the pistol, you place the HR against a hard surface and push the frame of the pistol forward to thus rack the slide.
MSRP: $24.99.
Availability: Currently 5 sizes available with some examples: Small: Keltec P3-AT, Ruger LCP, S&W Body Guard .380. Medium: Keltec PF9, Ruger LC9, Kahr CW9, Bersa .380. Large: Most Glocks, Springfield XD & XDM’s, S&W M&P’s, 1911’s. X-Large: .45 cal Glocks, Springfield .45 XD & XDM’s, S&W M&P’s .45, Hi-Point .45’s. Beretta and clones.
Some Considerations: This device is a very basic way to help folks rack a pistol slide very simply. Shooters can, as an alternative, simply hook the muzzle or front sight on a belt buckle or holster edge and push (with only their single strong hand) the muzzle of their gun downward quickly to rack the slide. Also, a lip of a table or a solid object’s edge can be used to accomplish racking the slide with just the strong hand and many practice this for an emergency situation. While the Handi-Racker device is made of a solid and quality plastic and functions well, it seems a shooter could use a less expensive block of wood or a surface’s edge to accomplish racking. However, someone physically challenged or with weak hand, finger, and/or arm strength could find this device easier and safer to use. A matter of personal preference and medical necessity. There are sights that have a steep enough angle to catch on a belt, holster, shoe, table top, etc. to help with racking. Some very reasonably-priced Ameriglo CLAW emergency sights for Glocks, S& W M&Ps, and Springfield Armory XDs have a curved edge that is designed to catch on objects when working the slide with one hand. Availability of 5 device sizes to fit a very wide range of pistols and simplicity of operation are advantages. Decide for yourself if the advantages outweigh the disadvantages of this device for your personal needs and medical condition.
Conclusion
I hope this information has helped you think about the proper technique of racking a slide, as well as some possible devices to assist and make it easier and safer for those of you with medical conditions or physical limitations to rack your slide. Of course these devices are not for everyone, so carefully decide for yourself if they meet your goals, purposes, and uses. They should not be a replacement for learning and applying the proper technique and how to properly and effectively rack your pistol’s slide, even in emergency, one-hand only situations.
Continued success!
Contacts
Chris McAninch
Handi-Stacker
www.Handi-Racker.com
Grimes, IA 50111
(515) 480-4905
Steve Wait
Brass Stacker Products, A Division of TGR Enterprises, Inc.
www.BrassStacker.com
Candler, NC 28715
(828) 665-4427
Photos by Manufacturers and author.
© 2015 Col Benjamin Findley. All Rights Reserved. This article may not be reprinted or reproduced in whole or in part by mechanical means, photocopying, electronic reproduction, scanning, or any other means without prior written permission. For copyright information, contact Col Ben Findley at [email protected].


