I want to share a story from hunting season’s gone by. On opening day the rifle my friend was using had been dropped, unknown to us at the time the scope had been damaged causing its point of aim to be thrown way off. As our day continued my hunting partner, several other friends and I were trying to find a buck that was wounded in a slough. I was helping push the slough with two of our friends when this buck ran out of the slough straight towards where my hunting partner was posting. He took aim with his rifle, and missed, by where his round hit the dirt it was way off, this buck continues to run towards him, he drew his .357mag with his off hand and fired. At a distance less than 5 yards bullet struck that buck, causing it to skid into the dirt. My hunting partner assumed a textbook combat stance when he shot the buck with his pistol with out aiming. Now as I think back about that day this is one of those stories, if I had not personally witnessed I may have doubted weather it truly happened.
How does a person become skilled in the use of a pistol for defensive/combats shooting? First we must start with the basics; the first step is forming the grip on the pistol. A good grip will aid in all types of shooting styles and positions.
Establishing your grip on the pistol starts when you begin to draw the pistol from your holster before releasing any retention devices. When forming the grip, you need to ensure you are gripping the pistol high enough on the back strap. The best way to describe the pressure of a good grip is like a firm handshake. If you apply too much pressure with your little finger it could cause your shots to go lower than your point of aim. Your grip must be uniform in pressure while not so firm it interferes with the movement of the trigger finger. The grip must center the pistol in your hand it is like an extension of your arm. A proper grip will not allow the pistol to shift in your hand when the shot breaks. When gripping the pistol the pressure should be straight to the rear and remain constant while pressing the trigger.
The next step is the draw sequence; most people who go to the range and practice do so with the pistol in an exposed holster. It is my opinion the person who chooses to carry a concealed pistol for self-defense should practice with their concealed carry holster they plan on using. By practicing with your concealed carry holster you are developing your muscle memory.
Clearing your concealed pistol to draw-To clear your shirt reach down with your non-shooting hand grab the bottom of the article of clothing lifting straight up till your pistol is cleared. To clear an unbuttoned or unzipped coat you can sweep the article back away from your holster as part of the draw stroke. This should be practiced to so you know which draw works best with your chosen wardrobe/pistol/holster system.
When drawing your pistol, lift the pistol straight up till it clears the top of the holster. Rotate the muzzle forwards till the muzzle is pointed down range and your wrist/forearm rests against your side. Keep your finger off the trigger, lying along the side of the frame. This is one position the weapon can be fired from in extreme close combat firing, and point shooting 1-5 yards. This also gives you more control over your pistol in case the suspect attempts to grab it from you at this point. Remember to keep your non-shooting hand in away from the muzzle at this point. If you are forced to use your non-shooting hand to defend yourself remember to keep it clear of the muzzle to avoid injuring yourself.
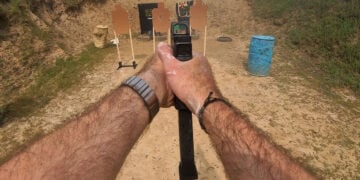
Hand Positions of two handed grip – Bring your shooting hand & non-shooting hand forward to the center or front of your body to form you two handed grip. The shooting hand should have the trigger finger should be on the side of the pistols frame operating independent of the rest of the fingers. The remaining fingers should be as high as possible on the front strap of the grip while the web of the hand should be as high as possible on the back strap of the grip of the pistol.
The non-shooting hand should completely encircle the shooting hand bringing the heels of both hands together. As much of the grip surface should be covered as possible, using this method will aid the shooter in controlling recoil. If possible the index finger of the non-shooting hand should be under the trigger guard. This will help unintentional down ward pulling during the trigger stroke.
Follow though- bringing the pistol forward and up to eye level utilizing a push-pull effect with the shooting hand pushing, and the non-shooting hand pulling to maintain a sight picture.
Remember, when using contact shooting, extreme close quarters shooting, and point shooting, you can fire your pistol without the aid of using the sights and generally hit center mass.
Contact Shooting
During a contact shooting, it is recommended to immediately break physical contact with the assailant. If a shot has been fired it is recommended you cycle your pistol in the event of a malfunction After disengaging prepare to follow-up at a more suitable target area, if the assailant continues the attack. Distances are usually 0-1 yards. Disadvantages are the high possibility of causing a stoppage during the event.
Extreme Close Quarters Shooting
ECQST from near contact range to 1-3 yards. These are engagements where the pistol cannot be brought to the eye level or where you would not want to bring it to eye level due to the possibility of being disarmed by assailant. This form of shooting can be utilized from the holstered and ready gun positions, with both single hand & two-handed grips. You should also be able to deploy various levels of defensive tactics to counter sudden deadly force encounters. While firing the pistol it should be held in close to the body to stabilize it while firing. Your body’s stance should be a combat or fighting stance. Keep in mind this is to be used in “fistfight” distances requiring the use of deadly force. This method should be used till you can break contact enough to follow up with aimed fire or the threat of deadly force from the assailant has stopped.
Point Shooting
Point shooting is generally from 3 to 7 yards. The method should be as follows: The pistol is held at line of sight. Your focus is on the threat, or a specific visual target point on the threat. Focus is not on the sights, point shooting is successful due to muscle memory developed by training and practice you are able to perform this shooting stance with proficiency. Remember you may not have fine alignment of the sights but nevertheless in your mind’s eye, you can bring your pistol to bear indexing with your hand eye coordination to aim. This is a basic form of point shooting where you may or may not use the sights.
It is my opinion that a person learning to use a pistol for self defense should learn to shoot from all positions using both aimed and non-aimed fire. This should instill confidence and ability in their skill to use handgun to defend them if faced with a deadly force situation. It is in these sets of circumstances, speed, confidence and the ability to use your handgun from ether hand in any position with or with out the use of sights is crucial.


