

It’s possible – there’s a conceivable chance that for whatever reason, you don’t have a holster handy and you need to carry. A lot of this can be eliminated by planning ahead but being adaptable is a good trait as far as concealed carry goes.
In this article, we’ll discuss some improvised options and the criteria we have when designing your own make-shift holster from scratch.
Obviously, nothing in this article should be construed as advocating for carrying in this method, but if you’re in a slump for whatever reason – it’s better to attempt to carry safely than to just throw a gun in your pocket and hope for the best.
Our criteria for developing any make-shift holster has to include the following:
- Protects the trigger housing group
We need to prevent the accidental chance of a finger slipping into the trigger well. This is the source for a lot of negligent discharges. So, when designing a MacGuyver solution, we have to take this as a top priority.
- Keeps the pistol grip accessible
If a makeshift holster obscures or blocks the pistol grip, you’re suffering badly if it comes time to use it.
- Holds retention over the pistol itself
If the sheath can just slide out effortlessly without you pulling on it, it’s really serving no purpose.
Pocket Carry “No Budget” Holsters: Cardboard Sleeve
Cardboard and duct tape can fix just about anything. For this holster, we’re going to use a standard box quality ply of cardboard and wrap it around the frame of the pistol we intend to carry. It’s going to be reinforced and tightened with duct tape along the seams. An optional modification you can choose to do is punch holes along the exterior and use zip ties to securely fasten it inside the waistband.
NOTE: While designing your makeshift holster, please unload and clear your firearm.
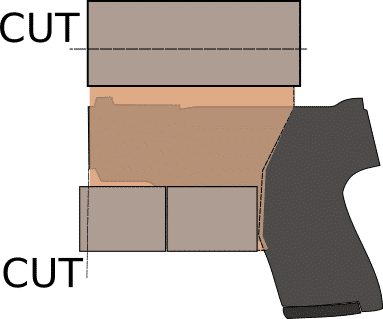
STEP 1: Lay out your handgun onto the lower half of a square or rectangular piece of cardboard.
STEP 2: Fold the cardboard over your handgun.

STEP 3: Mark the end of the barrel, below the trigger well, and along the pistol grip.

STEP 4: Cut off the excess cardboard.

STEP 5: Place duct tape to bring together the two ends of the cardboard beneath the trigger housing group.
STEP 6: Place duct tape along the cardboard folded over top of the upper receiver to reinforce it.

STEP 7: Cut away excess duct tape and reinforce to taste.
Now you have a very basic holster that protects your trigger guard. This is suitable for a pistol that you intend to put into a deep jacket pocket.

Alternately, you can loop zip ties through the excess of the holster above the upper receiver and below the trigger housing group (where reinforced by duct tape) and zip tie the holster to the inside of your waistband.
By all means, use extra strips of duct tape to secure and fasten down the cardboard so that it makes a tight sleeve for your handgun. The point of this is to try to achieve a decent retention better than we’d expect from simply throwing the gun into a pocket.
This should never be considered a longterm solution to a professionally designed holster but, in an emergency, it may just do.


